Puppet-in-Progress: From the foam up

Foodie

Well-Known Member
Joined
May 20, 2002
Messages
1,042
Reaction score
110
Thank you! If you approve of my Gobo, than I know he looks good.

His head is not sewn onto his neck. Rather, it's attached to a sleeve, which I safety pin to his, um, exit port. I've done all of my puppets this way since Derpy. This allows them to turn their heads freely, and if I have to change their clothes I can take off the heads rather than risk damaging them while pulling shirts off.

Still gotta make Wembley's shirt fabric...
Coooooolness. I like Gobo's dimples. I'm not a million percent sure, but I think my Boober's head comes off separately too. :smirk:
 

Slackbot

Well-Known Member
Joined
Jun 14, 2010
Messages
3,543
Reaction score
3,155
I've already started my next puppet. As it will have some different features, what the heck, I'll dump more stuff of possible interest here.

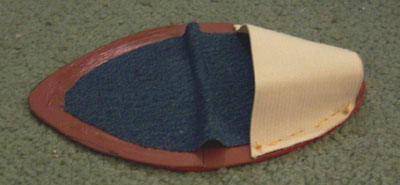
Here's how I do mouthplates:


The plate itself is gasket rubber, available from the plumbing section of Home Depot and other such stores. Sewn to the top, right through the rubber, is a strap for the fingers to fit in snugly. This is a must! For the top jaw, at least. I've never made a lower jaw that wasn't snug against the thumb, but if I did I'd put a strap there too.


After the strap is sewn on the top, I glue the red mouth surface in, then the throat and tongue. The tongue is shaded with a red Sharpie 'cause I like the effect. It is placed below the bend to avoid an unsightly horizontal crease. The throat does not overlap the tongue; I cut the top of the tongue out of the throat. Not doing so adds to the thickness of the fabric in there, plus sometimes you can see the throat under the tongue. There's a Gobo poser out there with a mouth like that. Ugh.


The mouth from the back. I glue some fabric to the back because that's more comfortable on the hand than rubber, plus it helps keep the mouth stable. I glue it on with the mouth closed so it won't get tight when closing the mouth.
 

Slackbot

Well-Known Member
Joined
Jun 14, 2010
Messages
3,543
Reaction score
3,155
Puppet hairdressing 101!


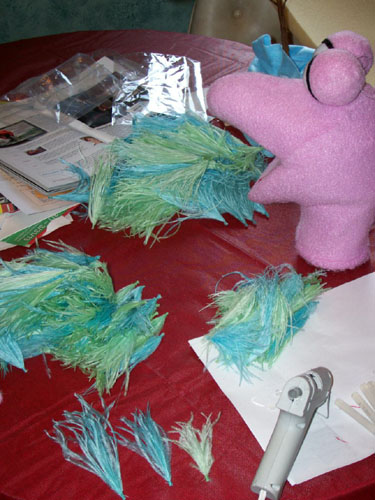
The start. I've for the head all ready except for the pupils (which I save for last) and, duh, the hair. For her hair I dyed dozens of ostrich feathers teal and light kelly green (with a bit of yellow added). Here's the head, two unshredded feathers to show what I've been working with, my cheapo bought-in-1991 glue gun, and the feather bits I've cut off the shafts and bundled together.


I have separated the feather bundles by length into short, medium, and long. I have the most of the long ones.


Starting to glue on the hair. I alternate between blue and green to make sure the colors are evenly mixed. I'm using the medium-length bundles here, and any that have a texture that ain't too great, as these bits will hardly be seen.


The "footprint" of her wig is outlined. From the front she had a kind of Cantus-like look at this point. The bits framing her face are long bundles. I used the floatiest ones so that they'd look good from the front.


Almost done! This is the spot where I pack the bundles most thickly. The feathers right behind her eyes are long ones, and I picked the floppiest ones so they wouldn't tend to stand up too much and give her a Wembley-esque mane. I had to be sure that the bundles stood up straight from the skull, so I held each in place and blew on it for a few seconds so the hot glue would set right.


And there we go! Look back at the first picture of this post and you'll see that the bottoms of the feather bundles look kind of like hair implants. I used the shortest feather bundles around her face to hide the bases of the plugs. That thing on the bottom is her baloobius, of course. It's just some long, straight feather bundles glued onto a bit of scrap fleece.
 

Slackbot

Well-Known Member
Joined
Jun 14, 2010
Messages
3,543
Reaction score
3,155
Janken: "Ugh. That photo makes my nose look enormous."
Me: "Jan, your nose makes your nose look enormous."
 

Slackbot

Well-Known Member
Joined
Jun 14, 2010
Messages
3,543
Reaction score
3,155
For this puppet I used large eye hemispheres from Out Of The Box Puppets for the visible surface. The covered part is a polystyrene ball with the front chopped off.

For other puppets I've used other things. Wembley's eyes are jumbo ping pong balls. Gobo's and Sage's are regular ping pong balls. For Boober and Sidebottom I used beads.
 

TheWemblin'Fool

Active Member
Joined
Nov 22, 2012
Messages
49
Reaction score
16
For this puppet I used large eye hemispheres from Out Of The Box Puppets for the visible surface. The covered part is a polystyrene ball with the front chopped off.

For other puppets I've used other things. Wembley's eyes are jumbo ping pong balls. Gobo's and Sage's are regular ping pong balls. For Boober and Sidebottom I used beads.

Ah, thanks for the info
 

Slackbot

Well-Known Member
Joined
Jun 14, 2010
Messages
3,543
Reaction score
3,155
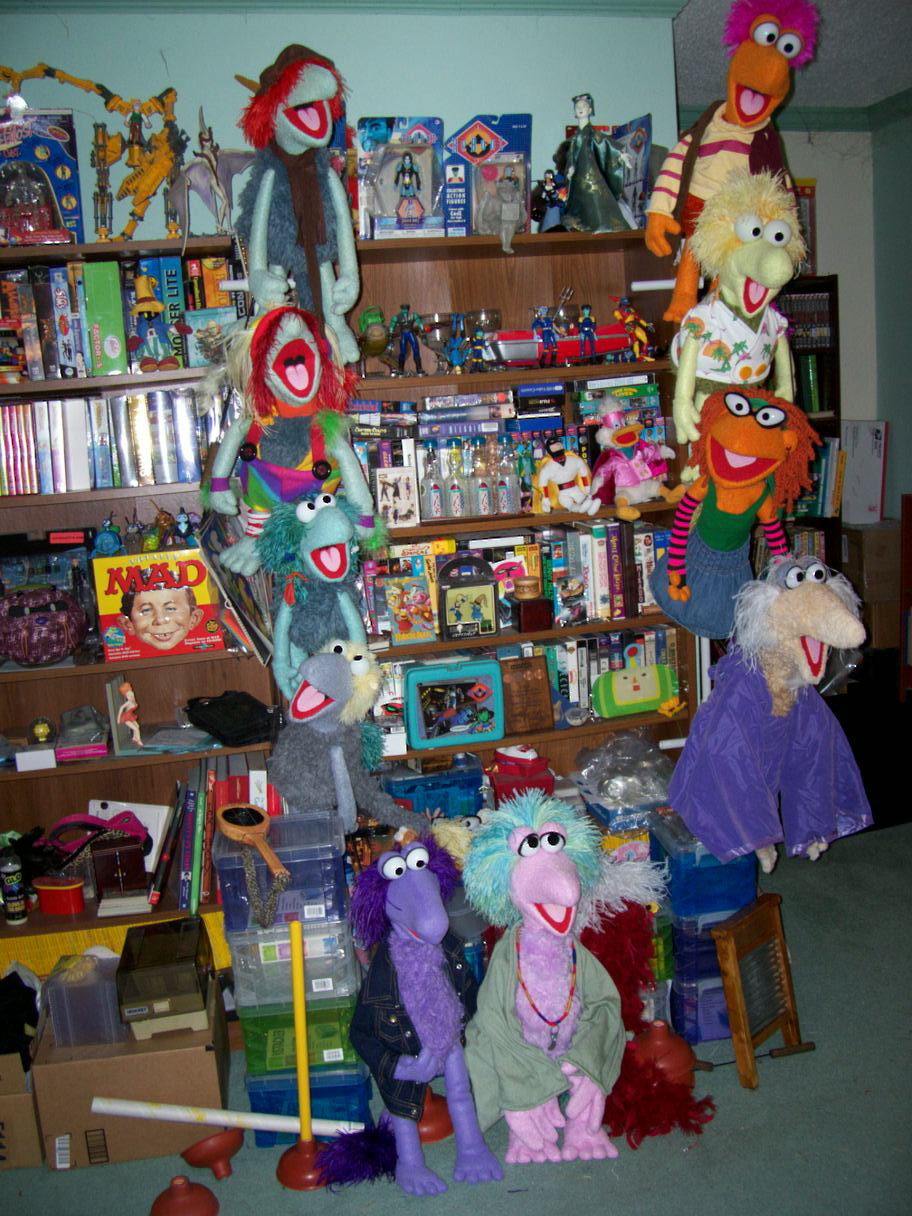
Here's the whole gang to date:


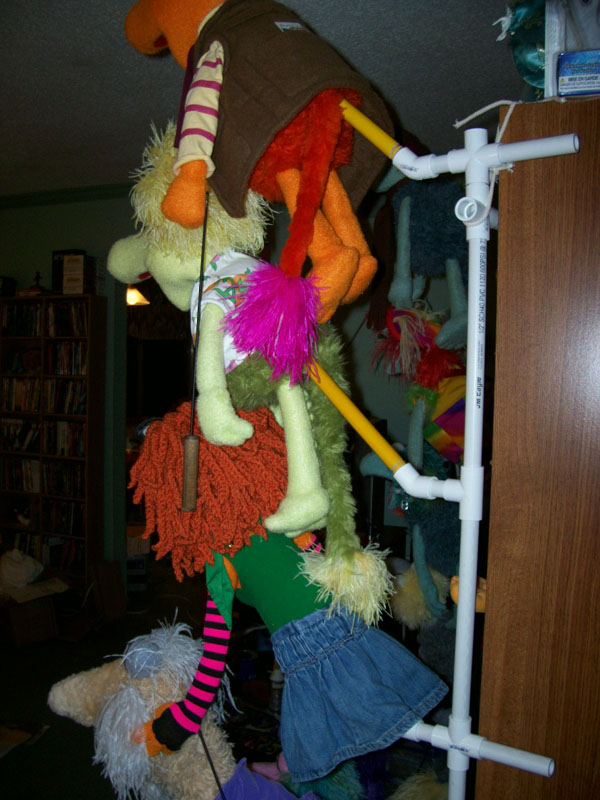
As you can see, I've got them a bit more organized now. I made some puppet racks. They're super-simple:


That's just plain ol' 1/2" PVC pipe, using T-joints, cross joints, and 45 degree elbows. I had planned on using capped PVC for the dowels too, but as it turned out the plunger handles fit right into the sockets. I made all this in about an hour, and it was very inexpensive. It was like playing with tinkertoys, in fact.

I haven't cemented the pieces together because I may think up a better configuration for the racks. The main issue is space, as in I don't have an empty wall to be-rack, so I have to place the racks where they will show off the puppets without getting in the way. Since those are my Funky Stuff bookshelves (where you can see a lot of the other things I am and have been into) It's not a problem if the edges get obscured a little.
 
Top